
 USD
USD
Jumbo DTG Printing: Go Bigger With High-Impact Apparel Designs

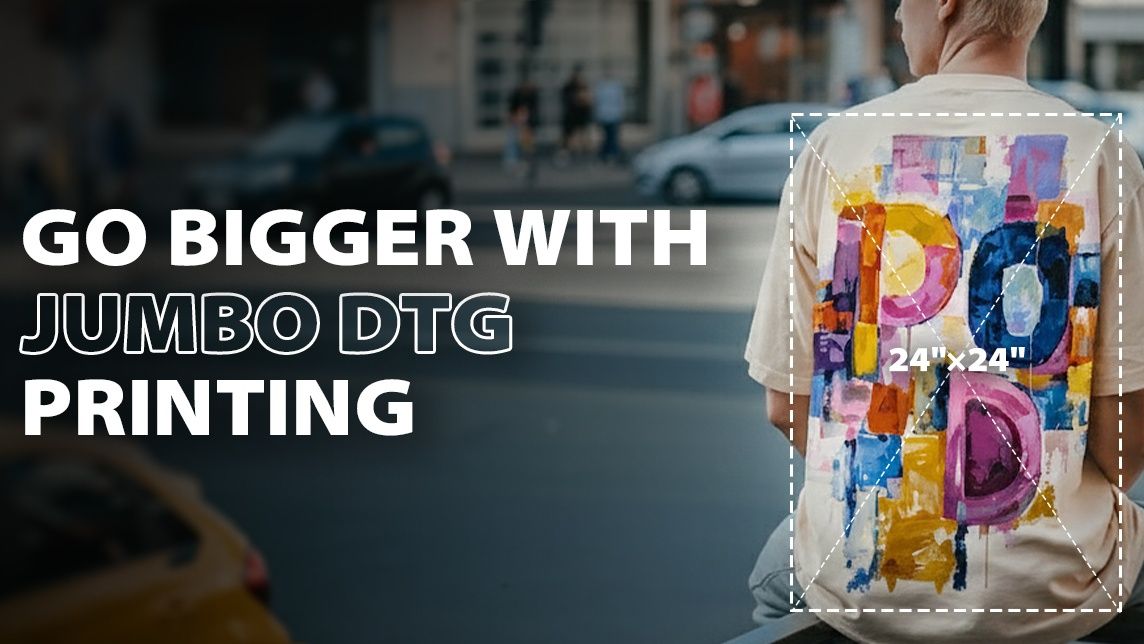
In earlier times, the available printing space limited creative options for on-demand apparel companies. Standard print sizes restricted brands, which meant designers had to reduce the size or detail of their artwork. This limitation was a major problem for brands that adopt print on demand mode, where large, striking designs are essential to their brand identity.
PODpartner recently introduced a major new feature: the 24×24-inch Jumbo Direct-to-Garment (DTG) print area. This change removes those old limits. Designers can now create much larger, full-coverage prints that spread across the entire chest and back of a piece of clothing. This technology is especially effective for common items like t-shirts, hoodies, and sweatshirts, where a bigger print turn your apparel into walking billboards.
This move toward bigger prints fits perfectly with current fashion trends, particularly in streetwear. Oversized graphics have become a defining feature of the industry. People want bold and unique designs that immediately grab attention. The new 24×24-inch print area fully supports this strong and growing market demand.
Unlocking Design Freedom: Bigger Coverage for Bigger Impact
The new 24×24-inch print size offers a huge benefit: the ability to create seamless designs that cover the whole front and back of a garment.
- Full Coverage: For items such as hoodies, t-shirts, and sweatshirts, designers can now stretch their designs across the entire piece of clothing. This leads to a more unified and visually powerful look. When a design covers the whole garment, it effectively turns the wearer into a "walking billboard" for the brand's aesthetic or message.
- Designer Examples: Think about popular brands like Vetements or Sp5der. They built their reputations on creating large, dramatic designs that fill the garment. PODpartner's users can now produce similar, striking designs much more easily and precisely, giving them much more room for creative ideas.
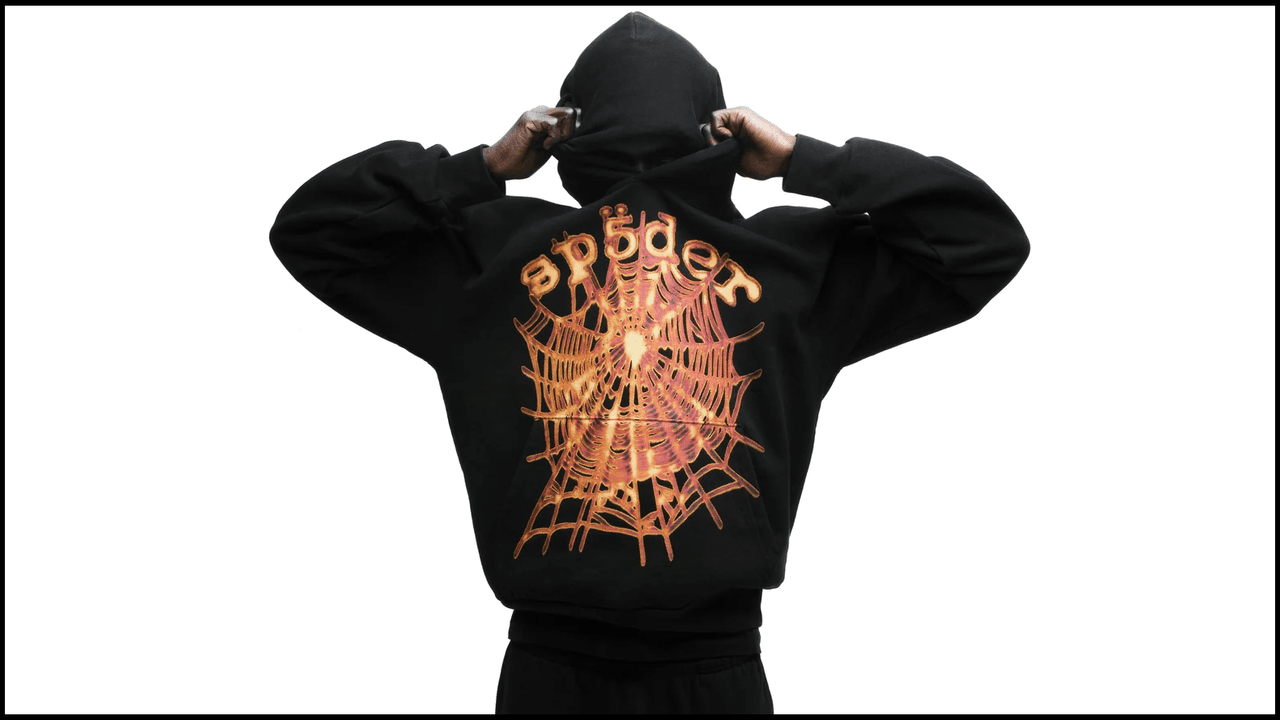
Source: Sp5der
Streetwear culture is all about making a clear and undeniable statement. Printing at a massive scale makes it possible to create highly noticeable, impactful designs that capture the core of modern urban style.
- Digital Engagement: Digital culture also drives this aesthetic. In a crowded social media feed, large, full-panel graphics act like instant, high-resolution visuals. They capture attention and boost brand recognition online.
- Visual Power: The oversized print area lets brands satisfy this need for immediate, large-scale visual impact. This ensures their products, acting as "walking billboards," connect strongly with the visually focused streetwear audience.
Increasing Product Value and Premium Pricing Potential
Larger, more detailed designs often make a product seem more valuable to customers. When a garment features a large, full-coverage print, consumers usually assume it is of higher quality and is more exclusive. This perception is vital for brands that want to position themselves in the premium apparel market.
- Higher Perceived Quality: In the fashion industry, bigger prints are often seen as more complex because they require greater technical skill and effort to produce well. This increased complexity can justify a higher retail price, allowing brands to attract a more affluent customer base. Furthermore, a garment that functions as a highly visible "walking billboard" offers a greater perceived utility; the customer is paying for both a quality item and a powerful statement piece.
- Premium Strategy: For example, the luxury brand Balenciaga is famous for its oversized graphics and bold designs. They sell their products as luxury items, despite their streetwear origins. By using the 24×24-inch print area, PODpartner's customers can follow this successful strategy. They can offer high-end, special-edition items that command a premium price tag.
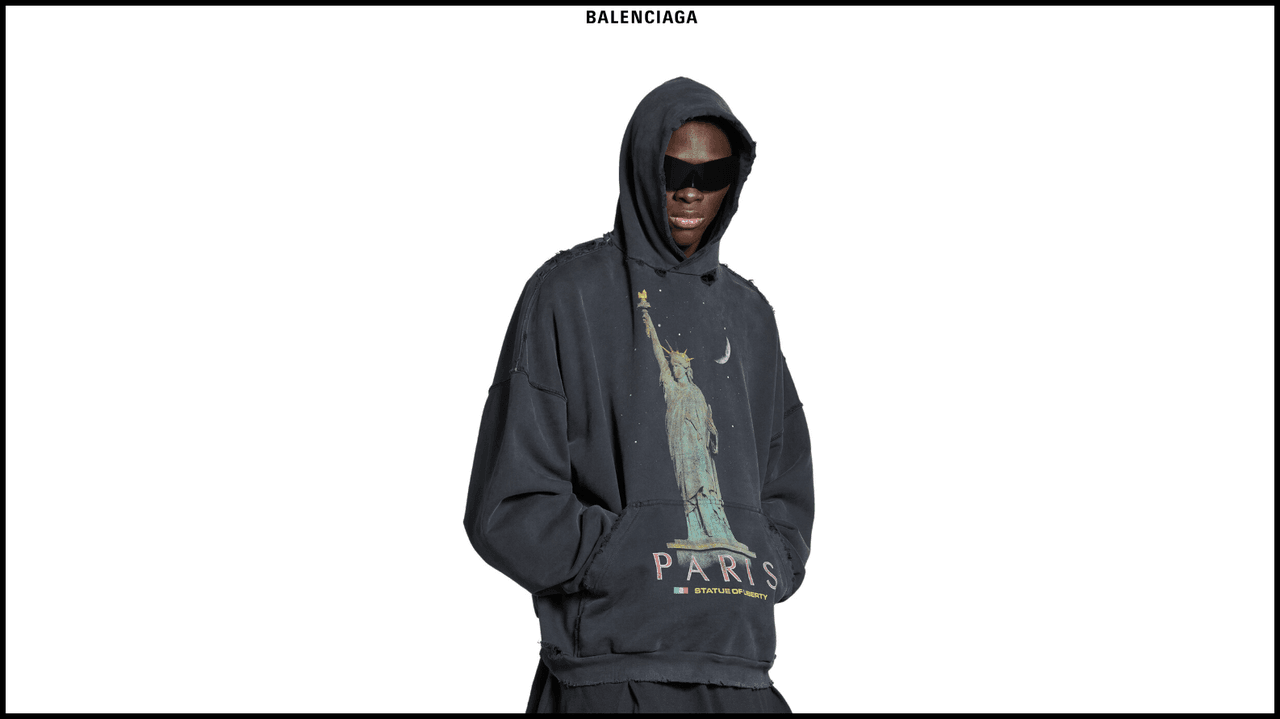
Source: Balenciaga
Practical Design Guidelines for Jumbo DTG Prints
To use the 24×24-inch design area effectively, designers must combine technical accuracy with strong aesthetic strategies. If a design file is prepared poorly and then enlarged, any mistakes will look much worse. A well-prepared design will maximize the print's impact.
File Preparation and Technical Considerations
Designers must follow specific standards to ensure their large prints are flawless.
| Requirement | Standard for 24″×24″ Print Area | Why it Matters |
|---|---|---|
| DPI Standard | 300 DPI (Dots Per Inch) at actual size. | Industry standard for high-quality, non-pixilated prints. |
| Minimum Pixel Dimension | 7200 pixels × 7200 pixels | Calculated as 24inches × 300DPI. Anything less risks visible pixelation and a soft, blurry look on the final garment. |
| File Format | PNG (Portable Network Graphics) | Crucial for maintaining true transparency around the design, ensuring only the intended artwork is printed onto the garment. |
| Color Profile | sRGB (Standard Red Green Blue) | Optimal color profile for DTG printing, ensuring the vibrancy and tone of the digital file is accurately reproduced on the fabric. |
Design Techniques to Elevate Your Prints
Designers can use a few advanced techniques to make the most of the larger print area:
- Seamless Integration (Avoiding the 'Box' Look): A common mistake with large-format printing is the 'poster effect'. This is when the design looks like a stiff, separate rectangle simply placed on the clothing. Professional designers avoid this by softening the edges:
- Gradient Fades: Use soft changes in color or transparency. This gradually makes the design's edges blend into the fabric's original color.
- Texture Overlays: Add small details like fine noise, halftone patterns, or distressed textures at the edges. This makes the graphic look like a natural part of the garment's fabric.
- Visual Hierarchy and Focal Points: A large print should not just be a uniform image. It must have a clear focal point. Designers should use the large 24x24-inch space to intentionally guide the consumer's eye. For example, the main logo or brand message should be placed slightly above the geometric center, which is an intuitive spot. The surrounding visual mass then supports this core message.
- DTG and Embroidery Combination: For the highest level of premium clothing, combining technologies offers a unique texture contrast. Designers can use the 24″ × 24″ DTG print for a full-back, detailed, and colorful graphic. Then, they add a small, high-density embroidery patch (for example, 3″ × 3″) on the front chest or cuff. This provides a three-dimensional, tactile accent. The contrast between the large, smooth DTG image and the dense texture of the embroidery creates a garment with exceptional sophistication and depth.
How to Start Designing with the Jumbo Print Area
Brands can immediately begin using the new 24x24-inch DTG print area in the PODpartner platform. Starting your first high-impact design is a simple three-step process:
- Filter for Compatible Styles: First, go to the PODpartner Product Catalog page. On the left sidebar, use the filter option named Jumbo DTG. This selection will show you only the styles that fully support the oversized printing capability, such as specific t-shirts, hoodies, and sweatshirts.
- Enter the Design Creator: After you select the garment you wish to use, click the "Start designing" button. This action will take you directly into the Design Creator tool.
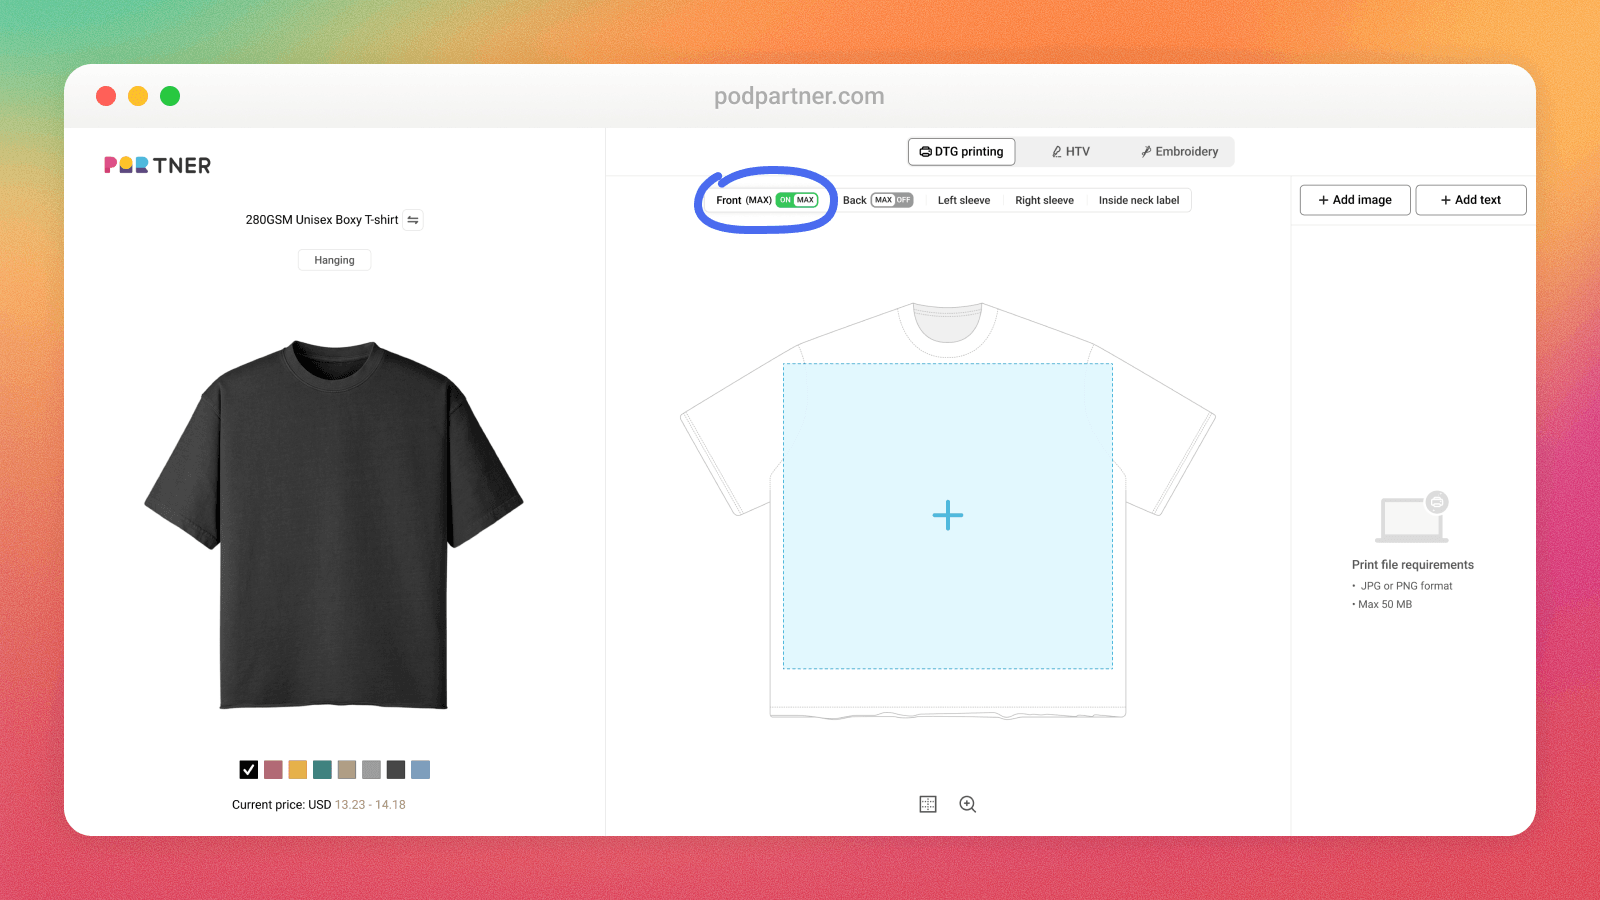
- Activate the Jumbo Canvas: Once inside the Design Creator, you will see options for different print placements (Front, Back, Sleeves, etc.). Click the "MAX" button located next to the "Front" or "Back" placement options. Activating this switch will expand your printing canvas to the full 24x24-inch size, giving you the expanded area to place your large-scale artwork.
The Future of Premium POD Apparel Starts Now
The POD industry is moving beyond just putting a logo on a shirt. Today's customers demand clothing that reflects a high level of professional design and production quality. Historically, achieving this quality while using a scalable on-demand model has been difficult.
PODpartner's strategic investment in the jumbo DTG print area directly addresses this market change. It gives ambitious e-commerce brands the capability to move from being basic 'merch' sellers to being premium apparel creators. This technology offers a new, expansive canvas for designers. It enables brands to achieve higher average order values (AOV), command better profit margins, and establish an authoritative position in a competitive market.
PODpartner is providing the necessary technology to make your most ambitious ideas real. Now, your only limit is the depth of your own creative imagination. You can begin designing your next high-impact collection today!
Frequently Asked Questions about Oversized DTG Printing
Q: What is the exact size of the Oversized DTG print area on PODpartner?
A: We offer a massive 24″ × 24″ (61cm × 61cm) print area. This is significantly larger than the industry standard (usually 12″ × 16″), allowing for full-coverage designs on the front or back of hoodies and tees.
Q: How do I activate the 24x24 print area in the Design Creator?
A: Once you have selected a product compatible with Oversized DTG, enter the Design Creator. Look for the print placement options (Front/Back) and click the "MAX" button switch. This will instantly expand your canvas to the full 24x24-inch size.
Q: Which products support Oversized DTG printing?
A: Not all garments can handle such large prints. To find compatible items, go to our Product Catalog and use the "Oversized DTG" filter on the left sidebar. This usually includes our premium heavyweight t-shirts, hoodies, and sweatshirts designed for streetwear.
Q: Can I combine Oversized DTG with Embroidery?
A: Yes! This is a great way to increase product value. You can use the 24″ × 24″ DTG print for a large graphic on the back and add a high-density Embroidery logo on the chest or cuff to create a sophisticated, mixed-media garment.
Q: How do I avoid the "sticker" or "box" look on large prints?
A: To avoid the "poster effect," we recommend using gradient fades or texture overlays (like distressed noise) at the edges of your design. This helps the graphic blend seamlessly into the fabric rather than looking like a rectangular block of ink.
Further reading

No Order Minimums

No Membership Fees

No Unsold Stock

No Quality Concerns
Only Creativity, Satisfaction, and Profits!