
 USD
USD
PODpartner Customizer: Add Personalization Option to Your Shopify Store


Ready to boost your Shopify POD sales with personalized print-on-demand products? Adding customizable product options to your store is now effortless with PODpartner's Personalization feature. Let customers personalize products with text, images, or dates while keeping your brand design intact—no coding required.
This guide will walk you through exactly how to set up product personalization on Shopify using PODpartner. Complete setup in under 20 minutes and start offering personalized products that command higher prices and build stronger customer connections.
Why Offer Product Personalization on Your Shopify Store?
Product personalization isn't just a trend—it's a proven strategy to grow your print-on-demand business. Here's why adding personalization options to your Shopify store delivers real results:
- Product personalization drives measurable business growth: 81% of consumers are willing to pay more for personalized clothing, and 36% actively seek out personalized products according to Deloitte research.
- Higher Revenue Per Sale: Personalized products command premium pricing. Customers pay extra for unique items that reflect their personal style, directly boosting your profit margins.
- Stronger Customer Connection: 62% of online shoppers choose brands that provide personalized experiences. When customers design their own products, they develop emotional attachment to both the item and your brand.
- Competitive Differentiation: While most POD merchants sell generic products, personalization transforms your store into a personalization destination where customers express their individuality.
Learn more about why Personalization feature is a game-changer for POD.
How to Set Up PODpartner Customizer on Shopify (No Coding Needed)
Integrating the PODpartner Customizer into your Shopify store is a straightforward process, designed to be quick and code-free. Follow these simple steps to make a Shopify product customizable and bring dynamic personalization to your customers.
Step 1: Design Your First Personalized Clothing
Before diving into the Shopify setup, your first step is to create a personalized product in PODpartner.
Choose a style from our product catalog and start designing with our intuitive Design Creator. Add up to three custom layers in the DTG printing tab, where customers can personalize with text or images. Once your design is complete, click "Activate personalization", name your layer.

Finalize Your Settings: Customers won't be able to change things like font size, color, style, position, or image maximum size. Confirm these details in your design, and check how they look in different clothing colors for best visibility.
Optional Personalization: Custom layers are optional. Customers can personalize or keep your default design. If you use placeholders, give clear instructions in Step 3 to avoid unwanted orders accidental orders with those placeholders.
Technical Considerations: Custom layers are currently for DTG printing only. Embroidery designs can't be custom layers, but they can still be on the same product with your DTG custom layers.
Step 2: Add Personalized Product to Your Shopify Store
Once your design is finalized, click the "Save" button in the bottom right corner of the Design Creator interface. A preview will pop up; simply select "Add to store" and choose your Shopify store. If it's not yet connected, you'll be prompted to install the PODpartner app first. After quickly setting up your product variants, images, descriptions, and pricing, you're ready to publish the product directly to your storefront.

Step 3: Set Up Custom Settings in PODpartner
Once your product syncs to Shopify, you'll be automatically redirected to the Custom Settings page. (You can always find it later via your PODpartner Dashboard > Stores page, under the "Custom Setting" column for your product.)

Here, you can easily configure custom settings for each product by editing our pre-provided templates or creating your own unique ones. Use these templates to create instructional guidance text that clearly describes your personalization service and walks customers through the design process. You'll also see a preview on the right, showing how your settings will appear.
Step 4: Integrate PODpartner Customizer into Your Product Page (One-Time Setup)
This is a crucial, one-time setup that seamlessly configures the personalization options into your Shopify store's design. Once configured, these settings will apply to all your customizable products from PODpartner.
1. Access your theme editor: From your Shopify admin panel, go to Online Store > Themes, then click the "Customize" button for your active theme. This will open your theme editor.
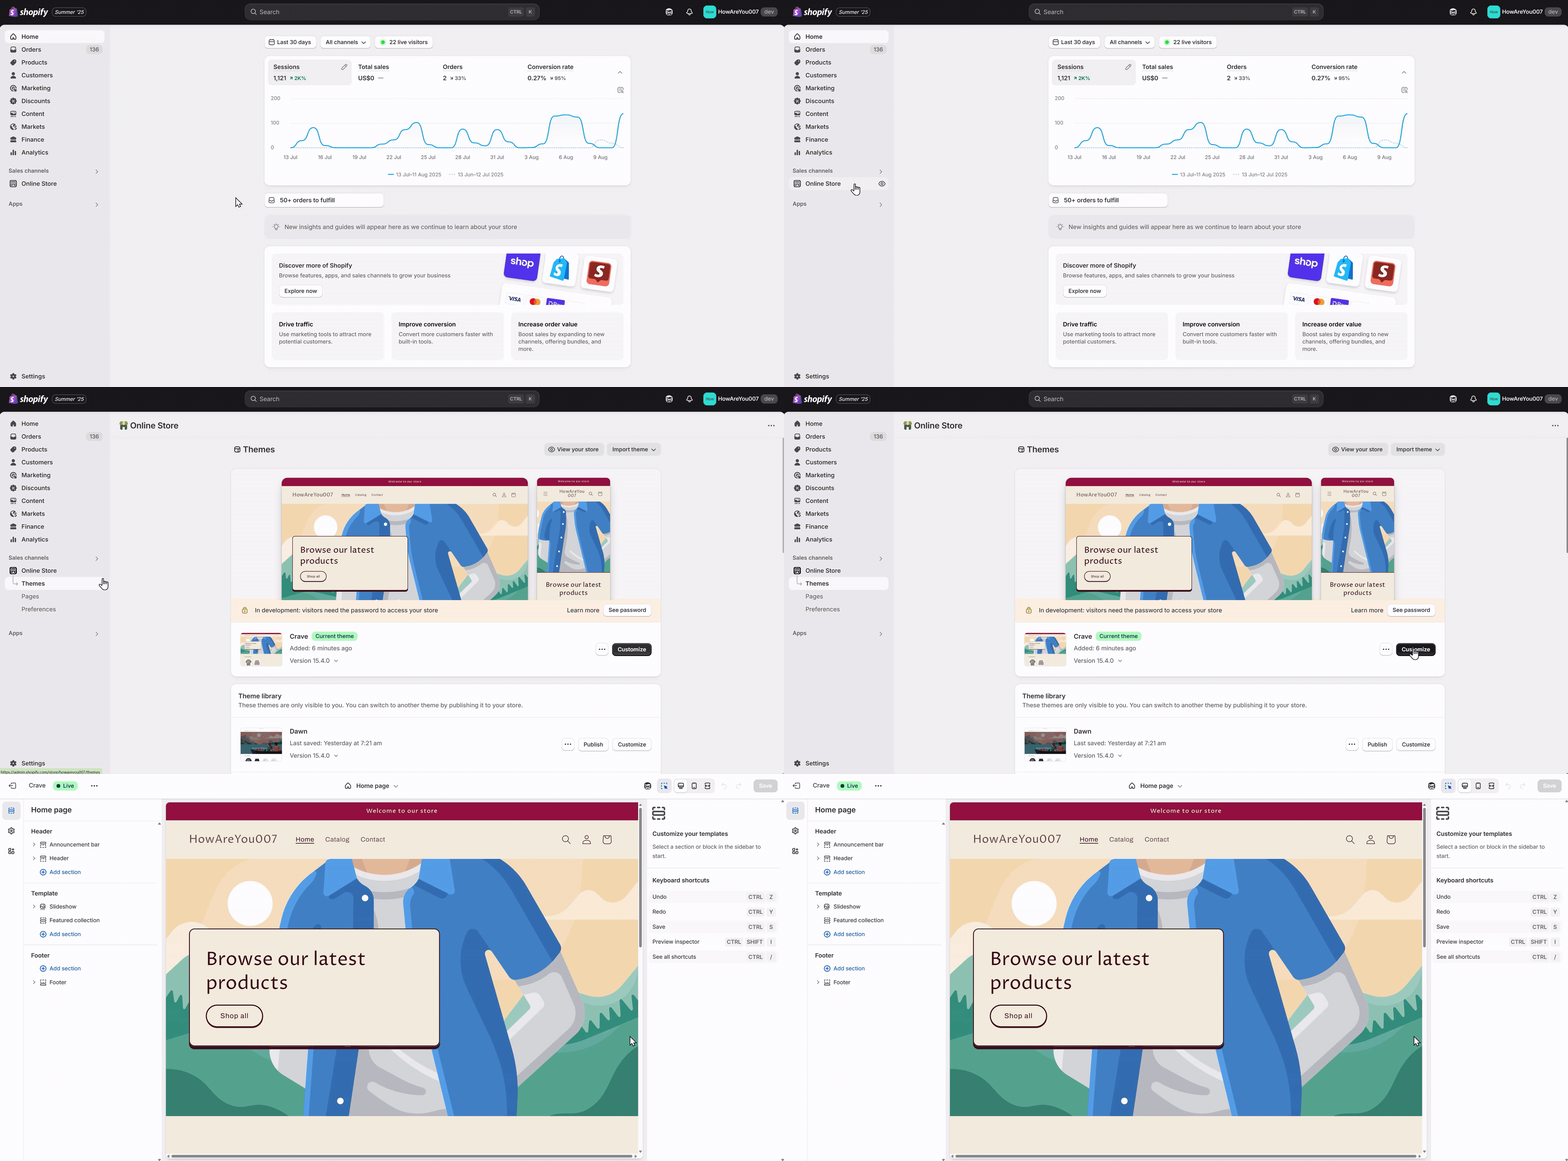
2. Navigate to the product template: In the theme editor, navigate to a product template where you want the personalization options to appear. The Customizer is designed to work specifically on product pages.

3. Add PODpartner Customizer app: On the product details page, click "+ Add section". From the drop-down menu, in the Apps section, select "PODpartner Customizer" to add the section.
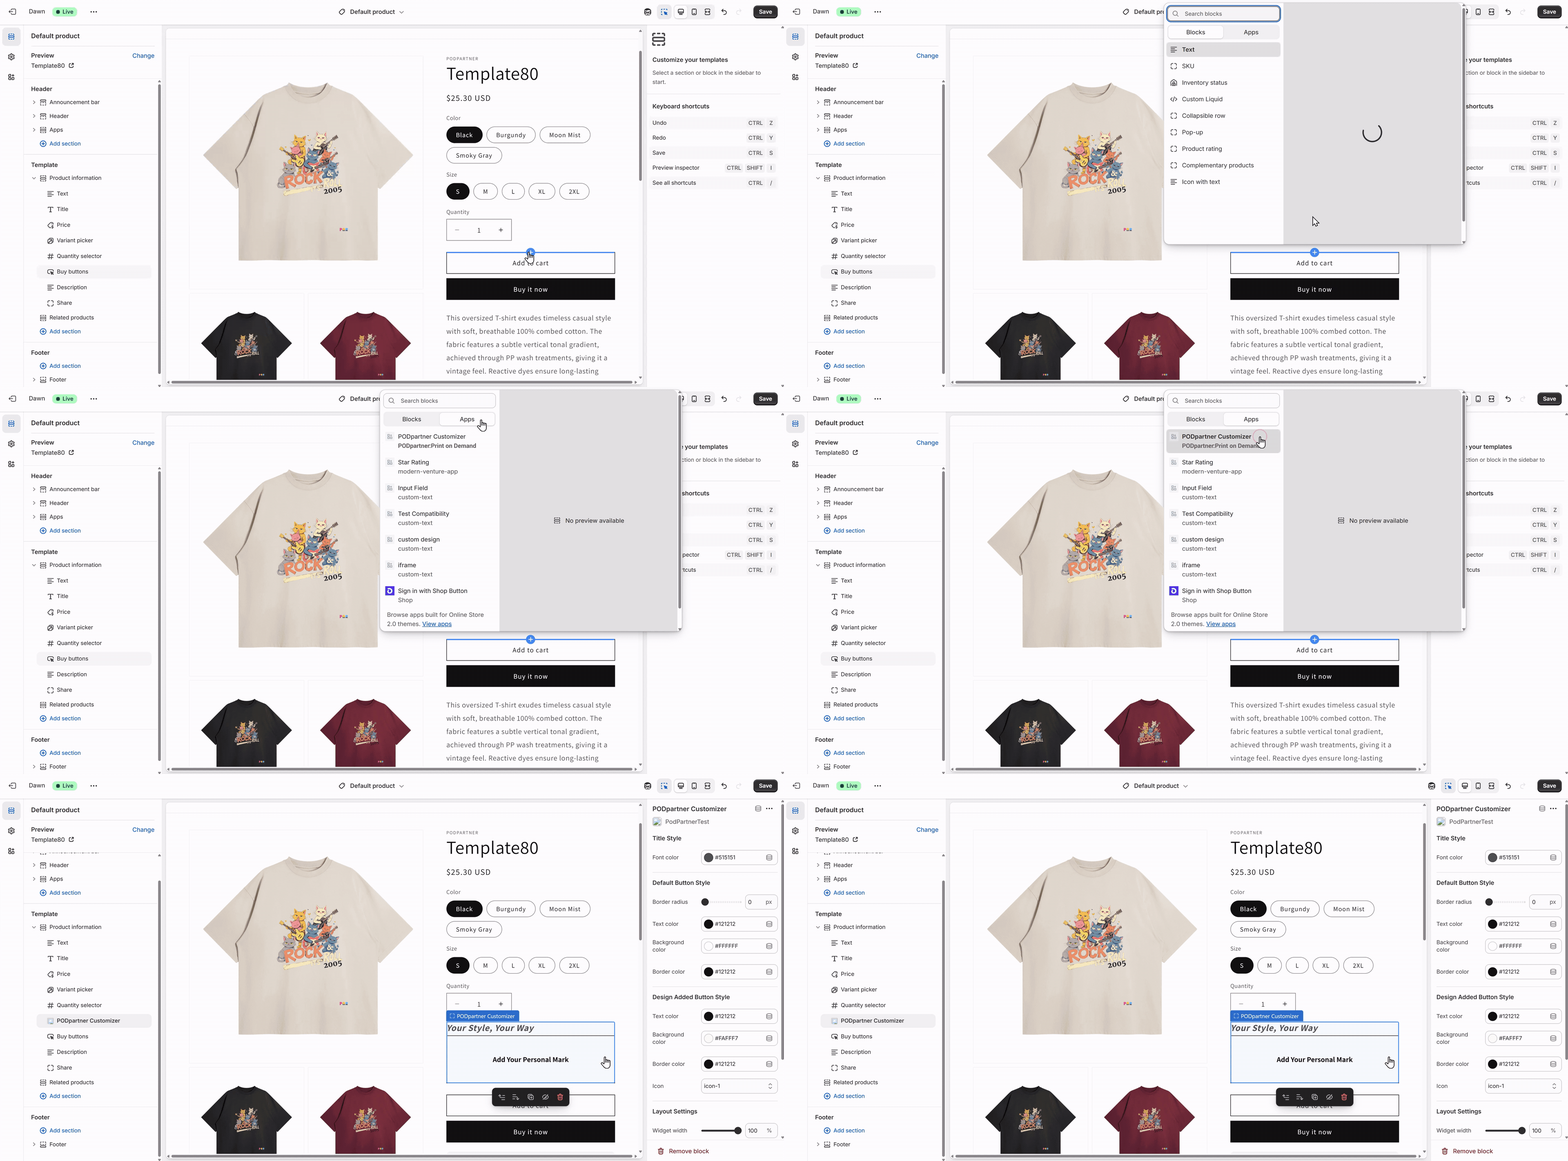
This section must be added to the product details page. And the selected product must include a custom layer and have Custom Settings configured in PODpartner.
4. Style to match your brand: Use the sidebar settings to adjust the Title style, Button style, and Layout so the Customizer perfectly blends with your store's aesthetic. Remember, "Default" is how the button appears initially, while "Active" shows its look after a customer uploads their design in the pop-up Customizer.

Read the article for a detailed configuration tutorial on PODpartner Customizer.
5. Save your changes: Don't forget to click the "Save" button in the top right corner to apply your settings.
At this stage, you've successfully set up personalization options for your PODpartner products, and they're now fully integrated and ready on your Shopify product pages.
Step 5: View the personalized product in your storefront
Go to your Shopify storefront and navigate to the new customizable product page. Verify that the Personalization button is visible and functioning correctly. Complete the entire personalization process by adding custom text or images. Then confirm that the design appears as expected and that all features work smoothly.
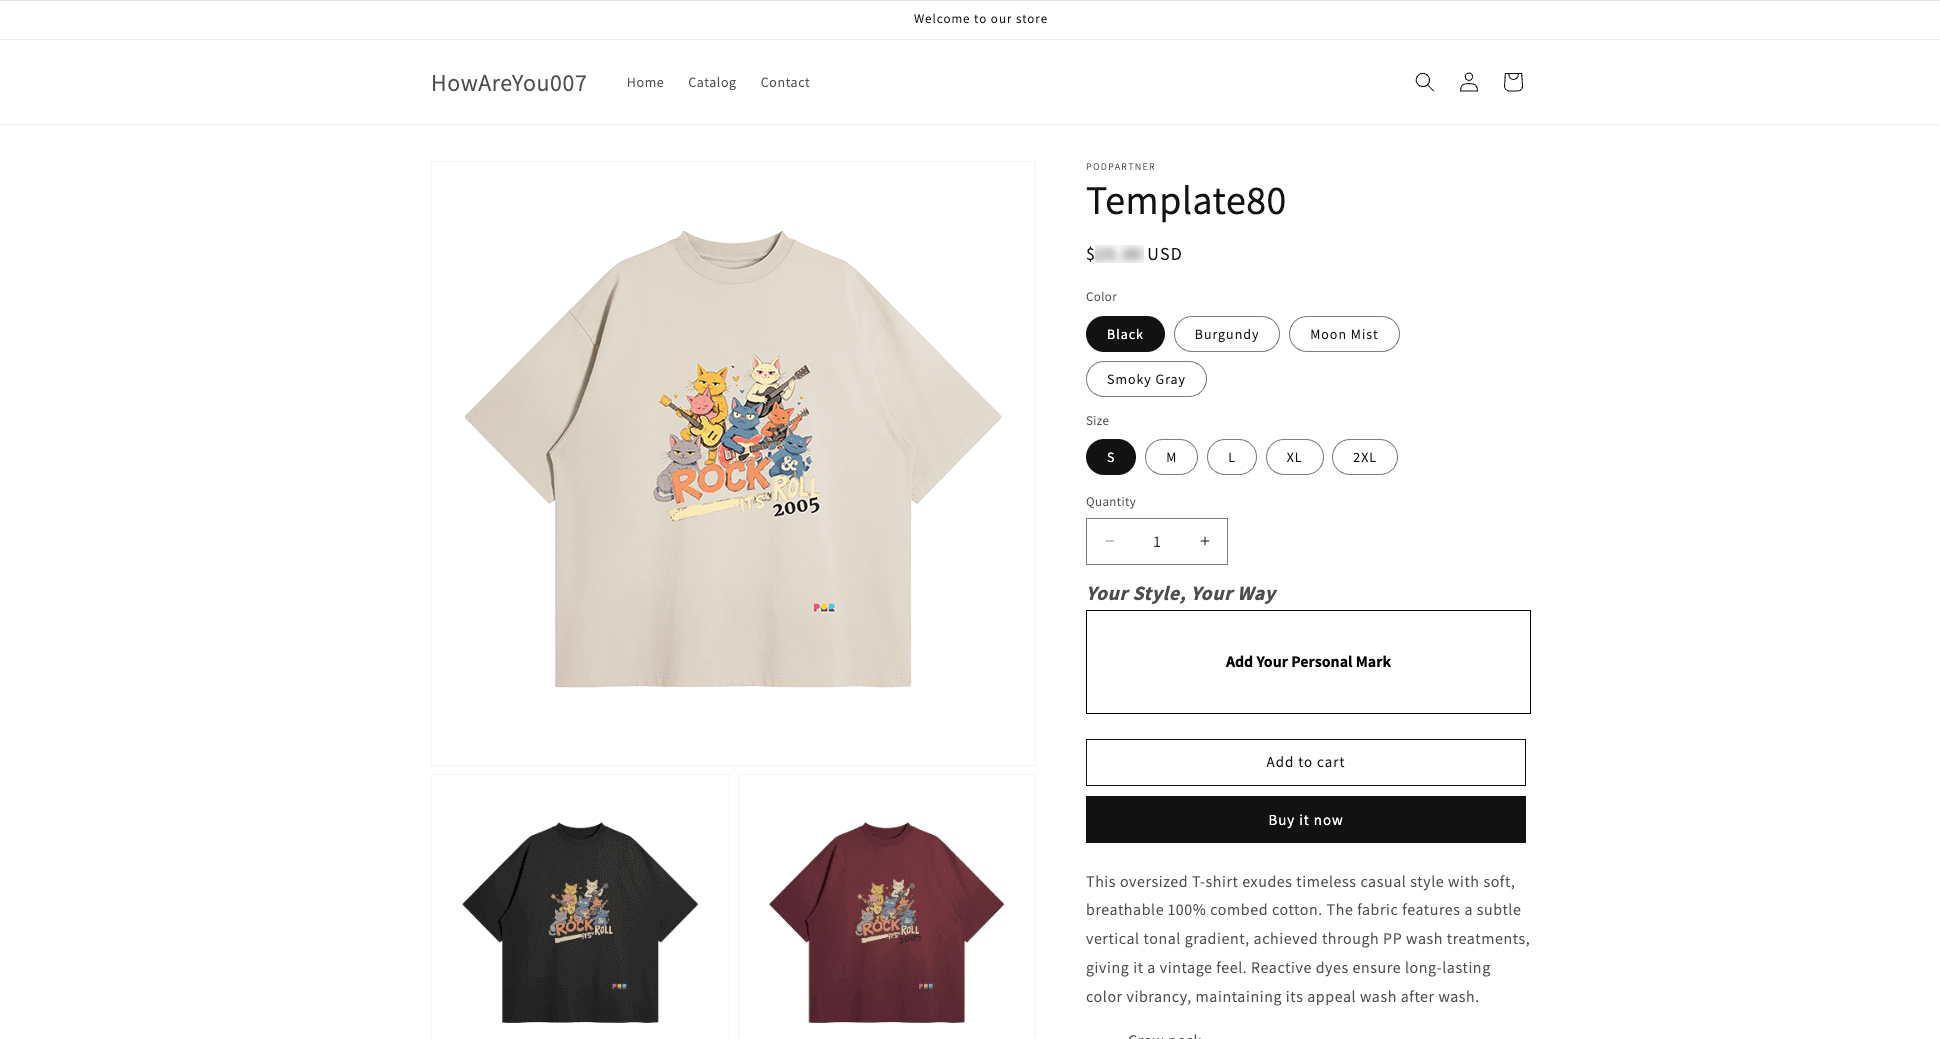
If a store product uses a branded neck label, you can transform it into a customizable product by directly adding a custom layer to that branded neck label.
Best Practice for a Seamless Personalization Experience
Making the personalization process smooth for your customers is key to boosting sales and loyalty. Here's how to ensure a top-notch experience:
1. Inspire Shoppers to Personalize
Write inviting, persuasive copy that inspires shoppers to personalize. Focus on the emotional appeal and benefits of personalization (e.g., "Make it yours in seconds" or "Create a one-of-a-kind gift"). Leverage the 'Custom Settings' in your PODpartner Dashboard to display on-screen tips so customers feel confident and excited to create their own unique products.
2. Gather and Implement Customer Feedback
Your customers are your best critics. Actively ask for their thoughts on the personalization experience. Always look for ways to update your product offerings and personalization options based on what customers suggest.
3. Promote Your Personalized Products
Get the word out! Highlight your personalized items on your website's homepage, share them on social media, and feature them in your emails. Show off cool, unique designs that your customers have created to inspire others.
FAQs about Personalization Options on Shopify
Can I use other apps for adding custom options on Shopify?
Yes, other apps offering similar personalization features are available on Shopify, butmany of these often come with monthly fees or per-order costs. However, if you're using PODpartner as your print-on-demand supplier, you won't need these. The PODpartner Customizer is already built directly into our app and is completely free. This also means there's no separate integration needed with other third-party personalization apps, streamlining your order handling and ensuring your personalized designs are accurately produced by us.
Why can't I find the PODpartner Customizer in my theme editor?
If you don't see "PODpartner Customizer" in the Apps when adding sections, check these common issues:
- Ensure the PODpartner app is properly installed and connected to your store.
- Verify you're editing a product page template (the customizer only works on product pages).
- Some themes might not support app blocks. If your theme cannot add our app, please contact us and provide the theme name — our technical team will assist you.
Will the customizer work on mobile devices?
Yes, the PODpartner Customizer is fully responsive and works seamlessly on both desktop and mobile devices. The interface automatically adapts to smaller screens for an optimal mobile shopping experience.
Sell personalized apparel with PODpartner
The PODpartner Personalization empowers you to tap into the booming market for personalized print on demand products, effortlessly strengthening your brand, fostering customer loyalty, and significantly boosting sales. With its intuitive setup and seamless integration, offering unique, personalized apparel has never been easier. Ready to transform your Shopify store? Start setting up your first personalized product with the PODpartner today!

No Order Minimums

No Membership Fees

No Unsold Stock

No Quality Concerns
Only Creativity, Satisfaction, and Profits!